Hi, I started building my oven and for some reason I must have started my curve a little late on both sides and now I have an inch to 1 1/2 inch gap from the brick to the foam as I am making my curve. I have 6 rows done on each side. But I started cheating a little by moving the edge a closest to the foam about 1/4 inch closer the last rows that the one row below it. Then I reread the instructions and it said put the bricks snug against the foam and I completely missed that. Do I need to deme the top 4 -5 rows on each side and start over? I have a feeling that gravity is going to take over and when I get higher the bricks are going to slide down and hit the foam anyway. Right?
Hi Rocco, and welcome to the BrickWood forum.
You’re running up against the ancient building geometry of arches, which are essentially two walls perpetually “falling” against each other and thus supporting a structure that seems to defy gravity. The key to their strength is where they meet, which will be a single row running the length of the arch at the top of the barrel.
The form that BrickWood designed is intended to make it dirt-easy for someone with no masonry experience to get to that place.
You didn’t quite follow the pattern, but I don’t believe you will have to demo and reset the firebrick. You started correcting and making your way toward the foam again, which is the right instinct.
Without a photo, I can’t say definitively that you’re going to meet up correctly when you get to the top, but it is perfectly okay to “step” the next couple of rows you do (in other words, cheat a little more radically!) so you are snug against the form before you arrive at those final courses.
Pay close attention to the ridges in the foam form, because in an ideal layout that’s where your mortar joints should be lined up.
If you decide that you want to remove those 4-5 courses and re-set them, use a mason’s chisel (wide and flat head) and a lot of care to chisel into the joints from the outside. Try not to point the chisel edge toward the upper or lower brick, but visualize going straight through the joint at whatever angle it is set. The high temp mortar is not cured at this point, so it should take just a few taps to dislodge a brick. You may find that the same mason’s chisel can be used to finish removing the mortar in large chunks—again be careful, because firebrick is fragile.
Hope this information is helpful, and whatever route you decide to go, let us know how you’re progressing. Congratulations on getting to this point in your project, and here’s hoping this is just a speed bump!
1 Like
Thank you. I have been using shims with the help of a neighbor and continued to build a row at a time and let it dry. Not sure I will ever get to the foam but maybe with a inch or two. If I have to cut bricks long ways for the last middle one I will do that. The good thing is that when I lay a level across the top of the oven from one side to the other it is level. My neighbor talked me out of the demo and said lets use supports underneath I just hope that when I get to the middle, and the defying gravity part that the oven doesn’t cave in…
You have a good neighbor there.
Unless I’m really misinterpreting what you’re saying, I don’t think you’re that far off. You’re still following the geometry for an arch, but it’s not precisely the arch suggested by the foam. It should still work just fine.
You can cheat a little at the top 3 rows to ensure they are covering the arch. I’ll say right now that if you find yourself in the scenario where you are laying brick lengthwise across the top then you’ll causing yourself a little trouble because of the chimney. Just think it through because it will affect how you set the chimney.
The complication I’d see (because I just answered another chimney form question) is that your chimney form will be sunk in an inch or so below where it would be if your firebrick were all laid snug in to the form. It will still be in the correct position (inset 4 ½ inches from front of arch to front of form), just riding a little low. But even that does not really matter much—you’re using the form to set your chimney, and as long as you really do snug those in on the chimney form, it does not have to go to the top of your chimney because the brick themselves will be in the correct position after the first course is set.
Keep doing a row at a time, nice and slow and some thought while the mortar dries, and you should be fine.
Thanks again. Is there a way to add pictures here? I don’t see an attachment. I have it to where the next bricks are going to be where the chimney is and I should be able to place them lengthwise. But with a lot of mortar to fill in the gaps. I only have one of the two chimney forms so I will have to move the first one to the second spot once I lay the brick. I’d like to send a pic so that it makes sense what I am doing?
When you are posting you should see a “photo” icon in the toolbar where you are typing. Like this:
On Mac you can also drag a photo file directly into the message box. I’m not sure if that works on other platforms.
I believe I did pretty much the same thing (added more mortar on the top to fill in the gap). At that point each row of brick should be resting on the foam form. There should still be a small angle between the center (top) row and each of the two side rows; enough that there is a bit of a wedge shape to the mortar.
As long as you are careful about where that half-a-form is placed, it really is a guide to make sure you have an opening in the right place. The method you suggest should work. The crucial thing is to have the setback and to cut the two firebrick per instructions.
Yes, please upload a photo and I’ll be glad to take a look.
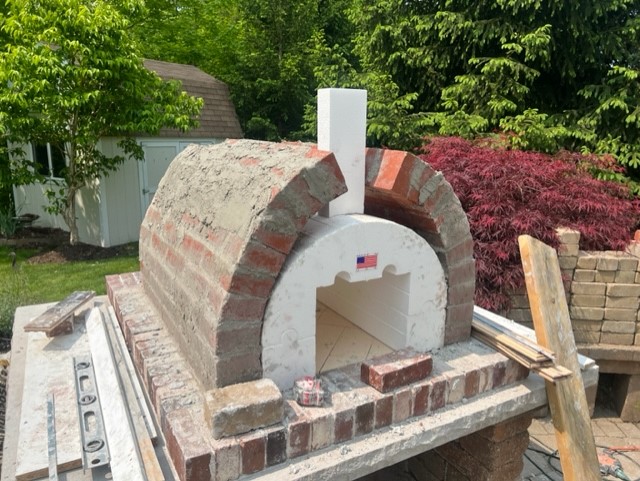

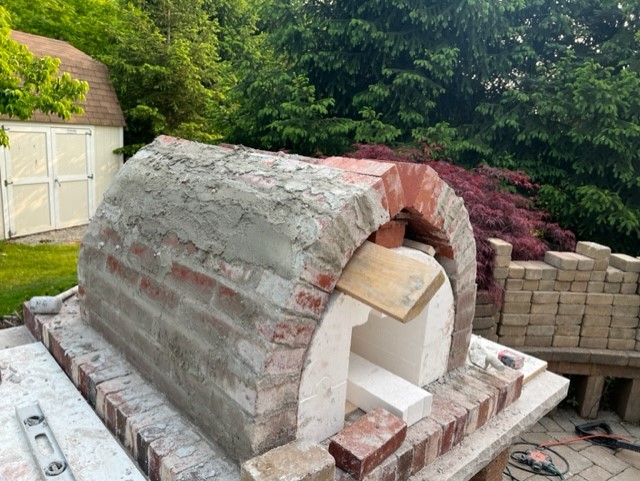
So this is probably the worst you have ever seen lol. I couldn’t get it back to the foam form no matter how much I cheated. So its been using shims and doing a row at a time and letting it dry. Now I am at the top and 2 bricks will fit with still some space in the middle but not enough for a half brick width. I could cut the fire bricks length wise and make it more of a thin brick dimension to fill in the wedge? I can get wedge fire bricks to go down the middle? One of my questions is, does the chimney have to start 4.5 inches from the front or can it start 9 inches from the front? I was going to demo it halfway up and my neighbor talked me out of it but I am thinking it may be a lost cause now?
And the 2 firebricks that are laying in the middle are not mortared. Just wanted to give you and idea of the room there is.
Yes, I think it’s time to “call it.” You made a valiant effort, but geometry was not on your side here.
The photos help tremendously. I give you (and your neighbor) a lot of credit for trying to make this work. It will not, because you no longer have a barrel arch (or dome), but rather a cathedral arch. It will not perform in my opinion because it will not direct heat and flame back down toward your food, which is after all the goal you’re trying to reach.
Rocco, since you’ve expressed your willingness upthread to demo if needed, I’m just going to flat out say “go ahead.” I would take out everything down to the third course, because the error appears to be introduced on the fourth course. Here is my advice from above.
Everything is still salvageable and reusable at this point as long as you don’t break a brick. Even then, you may be able to use part of that brick elsewhere. You will need more high-temp mortar, and I would wet down the firebrick again because the previous mortar will have sucked a lot of the moisture out of them.
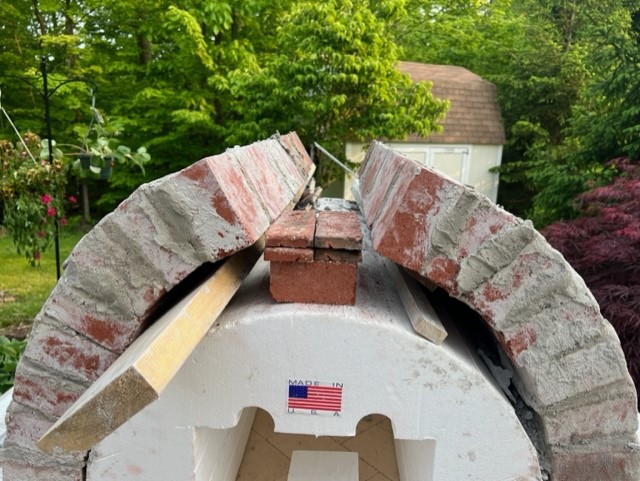
So…the other thing I see is that you have equal thickness in the mortar from edge to edge and side to side. That’s great when you’re building most brick structures. But here you’re going to need the mortar to help you achieve your arch and keep each brick angled in toward the form. Here’s a photo to show what I mean:
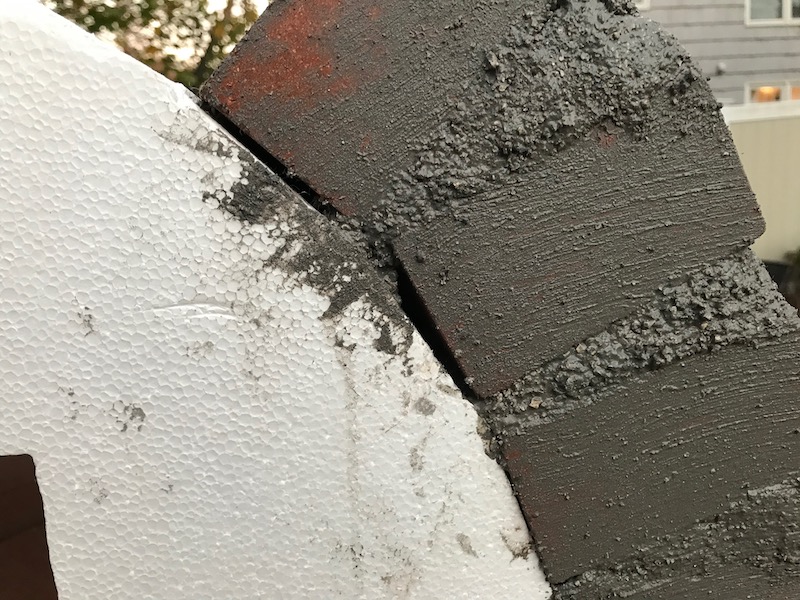
I think these are courses 5 and 6. Things to note:
- The firebrick are soaked—I had them in a large mason’s tub filled with water until right before I used them.
- I had started to move away from the form on course 5. (Oops!) So there is a lot of mortar on top of course 5 to make course 6 conform to the foam.
- That very-large joint on the outside is expected—and it does not matter. Your mortar joint needs to be thin facing the eventual fire.
- If you look closely you can see the ridges at the end of the foam. These are guides to show you where each course should lay. If you are way-low or way-high, then take a moment and adjust the mortar.
- To achieve this, you need to start with a good bed of mortar, then adjust it to make sure the brick stays at the angle you placed it. That might include tucking some more mortar into the outside edge to give it a firm bed.
From the photos it is clear where you started to “go North” on the arch. But please, don’t be discouraged about this! In my area we have a masons and bricklayers’ union training facility, and I’m pretty sure that many apprentices don’t turn out perfect walls on their first try.
This is completely fixable and within your capabilities, Rocco. Now that you can post photos, I’m hoping you’ll continue to show us how you fixed and moved beyond this. I won’t order you to have fun—that’s definitely @BrickWood 's job!—but I do recommend you keep thinking about the end goal while you make that arch beautiful. Good luck!
1 Like