Hi,
First post. First off, Kudos to those who are able to finish their ovens quickly. I’ve been working since May and still haven’t finished
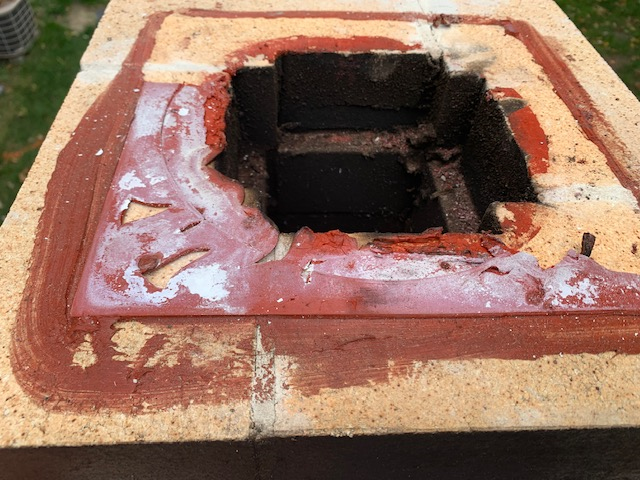
However I recently bumped the Duratech Cap lightly and it fell off. Furthermore it looks like the glue on the inside was either not fully cured or that it melted due to the heat. I used the glue that came with the kit and followed the directions for gluing the vent cap. Note that I started peeling away the glue in the below pic.
Has anyone ever seen this?
Is there a easy way to get that glue off the brick?
Welcome to the BrickWood forums, and sorry for the circumstances.
Are you saying this happened during your curing fires? Or by heat are you talking about the ambient temperature where you are?
If this is the silicone adhesive that comes with the Duratech kit, it’s rated for 500°F+ steady and shorter periods at 600°F. If you have not yet had a fire in your oven, or even if it was a curing fire, I don’t think it would be the heat.
The adhesive has an acetic acid (vinegar) component that cures the silicone by exposure to atmospheric moisture. Once it is fully cured it should have a consistency similar to rubber.
Is the adhesive that was left behind an elastic, or is it more rigid and brittle? I’m guessing that it’s the latter from what you’re describing.
If mechanical methods (scraping/prying with a putty knife) do not work, I’m not sure what else will. You may have to keep peeling.
Two suggestions for replacing the cap base when you get there:
Get a fresh tube of the silicone adhesive (high heat like the original). The manufacturer recommends that it be used within 18 months of packaging—and I’m hoping you did not get a tube of old product. When you apply the adhesive, use plenty of it, bring it up over the edges of the base plate, and seal it over the edges.
There are holes at the four corners of the base plate. Use four Tap-Con screws and anchors to fasten it mechanically at the four corners. In most cases the adhesive should be enough, but you want to be really sure this time that your plate is fastened, and that it stays fastened.
Again, I’m sorry to hear you had an issue, and I hope these suggestions are helpful. Please let us know how it all turns out!
PS: There are a lot of builders who don’t get this done in the minimum time frame—you’re in good company!
Thanks for the reply.
The oven has gone through the curing process and about half a dozen cooking fires. I put in three layers of insulation and can get the dome up to approx 900 degrees according to Mr. IR Thermometer.
As far as your question about the glue: Looking at the picture on the top and right, the glue nearest the chimney hole is elastic and sticky, kind of like chewed gum. The part where you see the brick was rubbery and peeled off with a putty knife and some moderate effort. The bottom of the flange had no glue stuck to it, just a thin layer of white somewhat greasy residue.
To get the glue off I used a putty knife and a small wire brush in my drill. This cleaned up the glue, roughed up the brick a little but required a very light touch on the mortar joints.
To re-attach the flange I decided to overkill. I used JB Weld Extreme Heat metal glue. It is advertised to survive 2400 degrees. I first tested on a spare fire brick to make sure it would bond and not damage the bricks. After a successful trial I glued the flange back on and it is currently curing.
Good hint about the tap cons. I’ll do that and test fire the oven this weekend and post the results.
That sounds like the adhesive didn’t cure properly, or even separated. (Thinking of the white greasy residue.) I’m glad you were able to remove all of it.
After a little research, I’m a bit concerned. Extreme Heat is an epoxy designed for metal repairs (like holes and cracks), not an adhesive. I know that JB Weld mentions outdoor grills and fireplaces, but I think that refers to sheet metal and iron components like heat exchangers. It will cure as a rigid mass rather than a flexible seal, like the silicone was intended to do.
I definitely understand your skepticism about trying silicone adhesive again, when the result the first time looked like neither silicone nor adhesive. I’m also, again, concerned that JB Weld introduces its own set of problems.
See how it works for you; let us know. Tapcons might be even more important here.
You bring up a very good point which I did not consider when I did it. I had one fire this weekend before the rain set in with no ill effects. However it was a small fire just for cooking burgers.
I have reached out to the brick manufacturer to see what the coefficient of thermal expansion is for their bricks. I’m guessing the repeated thermal cycling will eventually strain the joint enough to cause the glue (or bricks) to crack, though the smaller the difference in expansion the less critical it’ll be.
I’ll post when I know more.
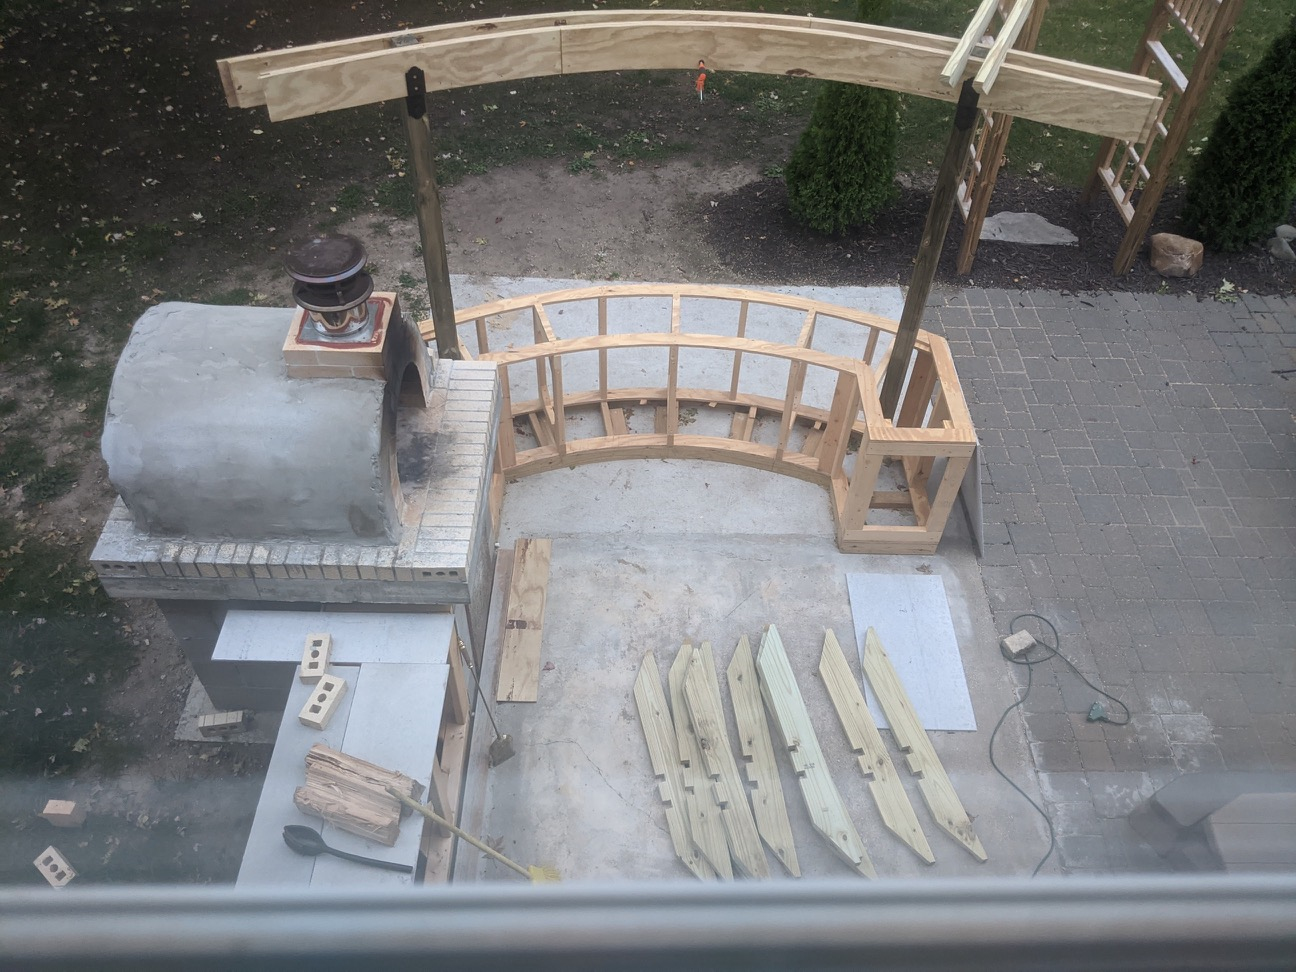
The pergola beams (qty 2) are actually three layers of 1/2" pressure treated plywood. I built a form using 2x4s on top of the curved cabinet structure using the two 4x4s as the basis to make sure the curve was correct. I then used construction glue and every clamp I owned plus some more that I bought to bend the plywood around the forms. Then I used screws, mainly on the inside where you can’t seen them, to add additional strength. I would have loved to laminate solid wood but I couldn’t find any 3/4" or 1/2" thick 8" wide pressure treated and I don’t have a planer.
When I removed the clamps the beams relaxed a bit. I secured one side of the beams to one of the 4x4s, dry fit the rafters to make the curve consistent and then used some clamps to get the beam in the exact position on the other 4x4, then more screws.
The weather is turning in Michigan, my veneer has been delivered and work has restarted. This includes finding another solution for the Duravent cap. I gave it a little twist and it popped right off with some of the glue staying on the brick and some staying on the cap. So put this one in the fail column.
I will go back to the high temp silicone and add the tapcons to the corners. Then I’m thinking I’ll embed the flange in high temp mortar and add a capstone for some extra strength.
Hi Ken! It’s great that spring temperatures are finally turning the season around.
Looking again at your original photo…it looks like you’re applying on top of the firebrick faces. They’re porous—if you soaked yours in water before trimming you’ll recall all the little bubbles that are released—but they may not be the best surface for adhesion.
I had applied about a quarter inch of high-temp mortar to cap off my chimney (and if you look at residential chimneys, you’ll see that’s how it is done). While I personally wouldn’t go so far as to embed the flange in mortar, I think you could extend your use of the high-temp to place a capping “floor” on top of those bricks. You can get a little artistic with the trowel and miter a slope into the edges, which will improve water drainage. Give it 24 hours to set up, of course.
Once that dries, I think the silicone adhesive will have a proper adhering surface. Because of your past experience, I’d still add the TapCons.
Let us know how it turns out, and hope your veneering goes well.
Just un-tarped my oven this weekend and noticed my cap was off too, a little frustrating. I’m going to try and scrape it clean and try again I guess, maybe try what Matt suggested and put down some mortar first to give it a different base other than firebrick.
We’ve shipped 1000’s of tubes of Xtra Bond High Temp Silicone over the years and we haven’t had any issues w/ the anchor plates coming off. So this is perplexing.
As Matt mentioned, when the product is fully cured, it will have a rubber like consistency, so it will have lots of “give” when going through heat cycles. And it is the best adhesive that can handle the extreme temperatures your oven / chimney will encounter.
Do you remember if the fire brick were wet / damp when you applied the silicone or were they bone dry?
Again - we never have had issues w/ the silicone, so I want to see if we can pin-point the cause (to prevent this from happening again).
I went to Heat and Sweep of Plymouth (one of the suppliers noted on the Brickwood resource page) and they echoed the advice from @BrickWood and @bikerbudmatt that the Red High Temp RTV is the way to go. They had two pieces of advice:
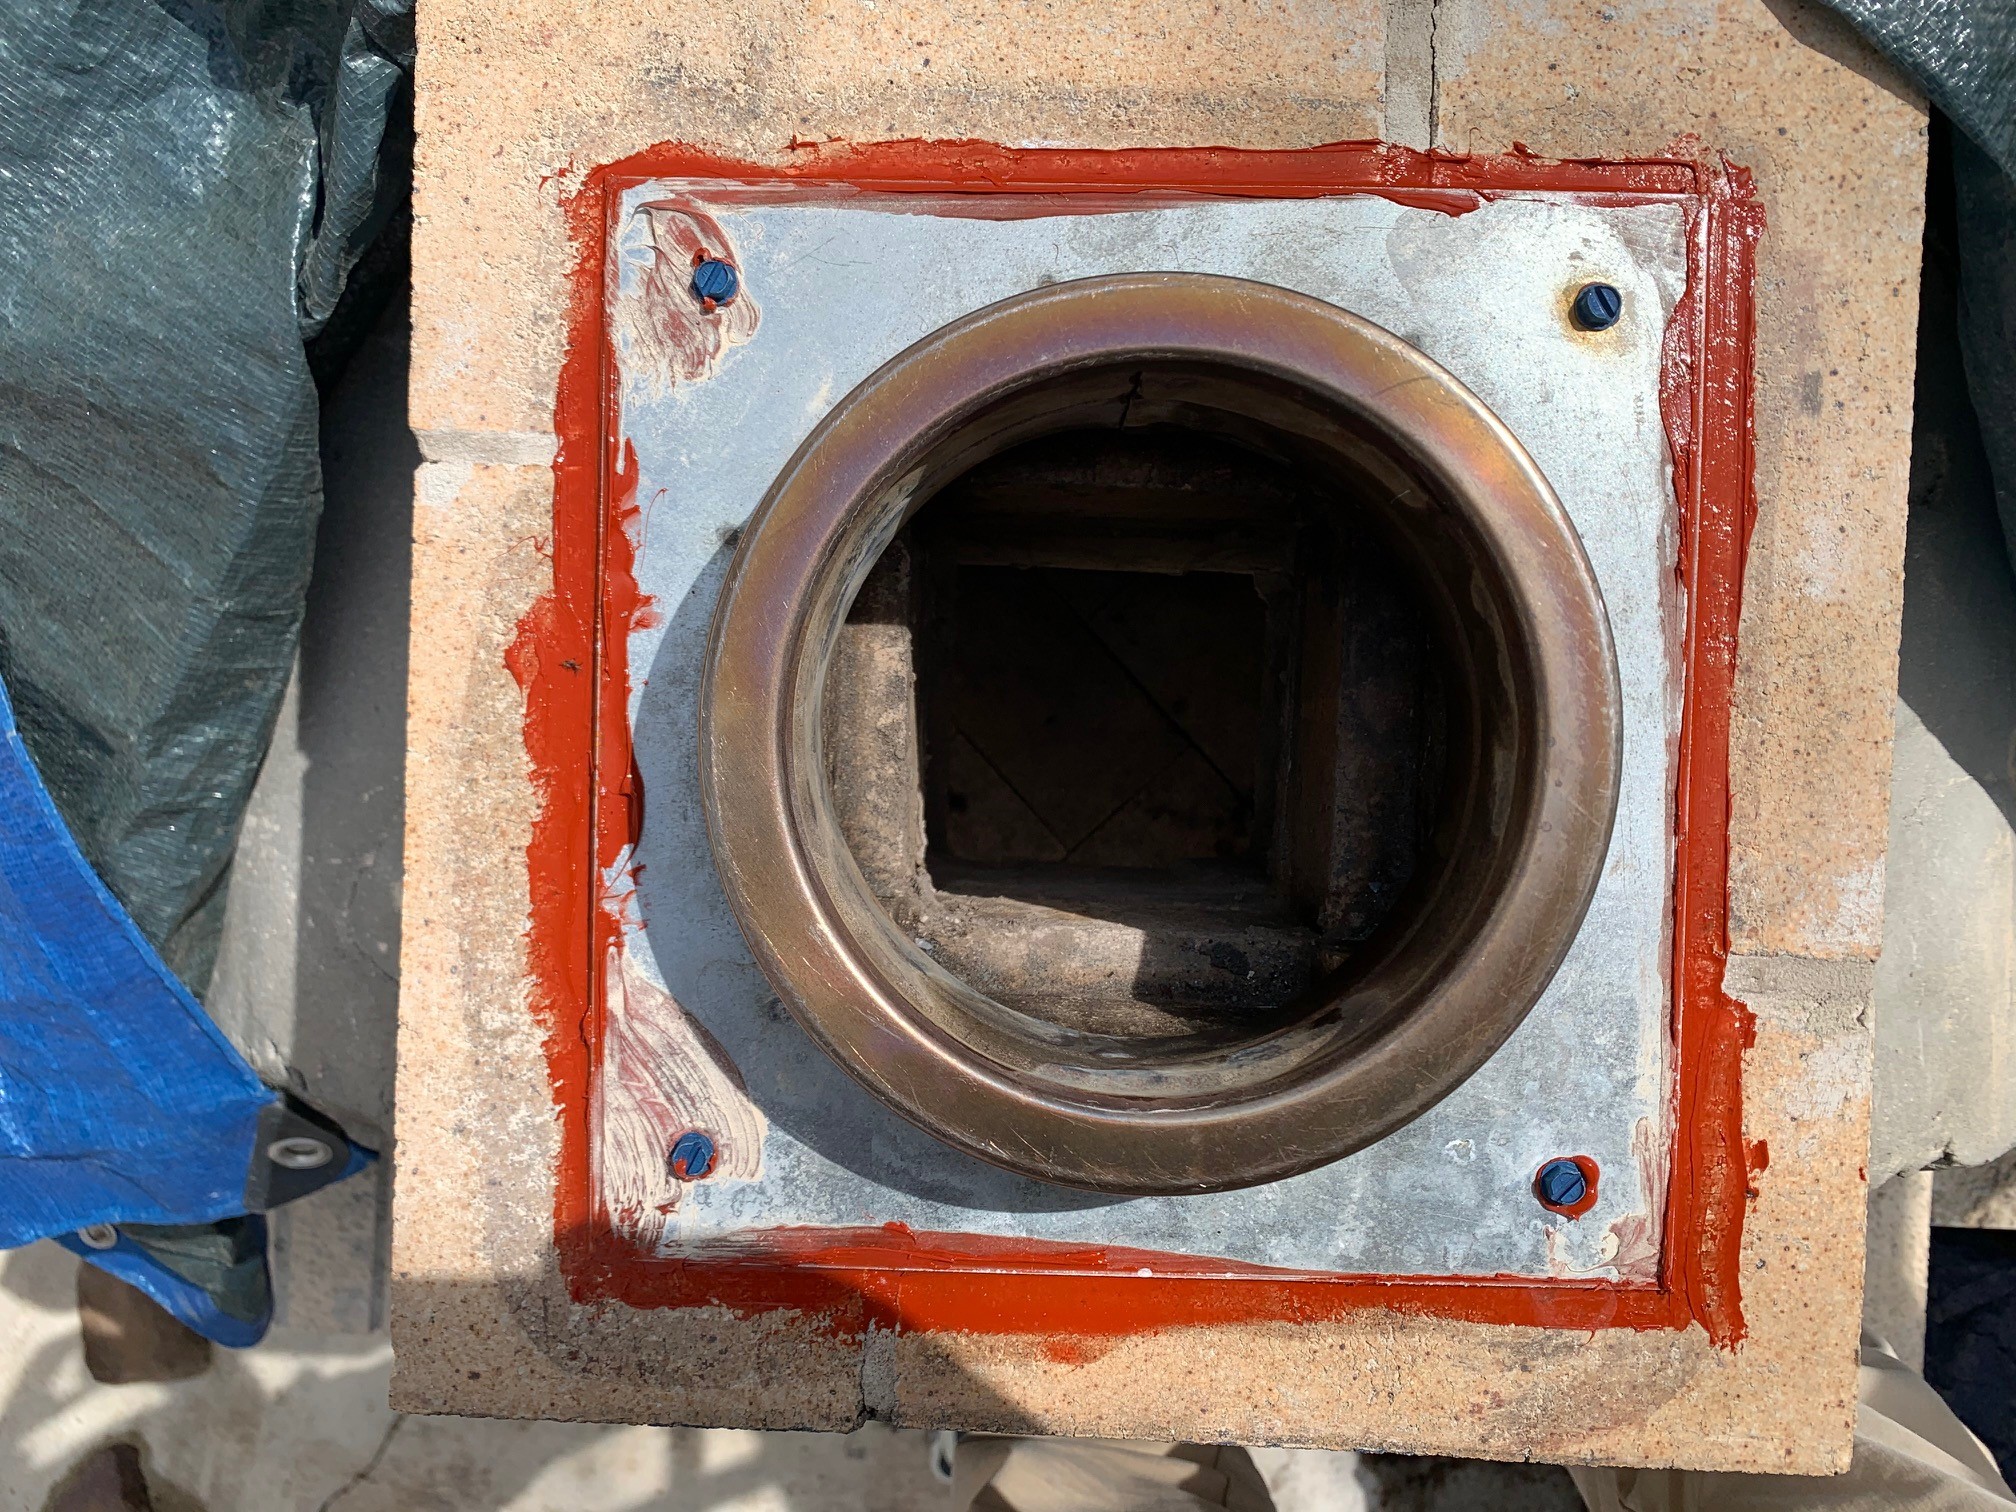
The RTV will not handle the high temperature near the inside of the firebrick but will have no problem near the outside of the brick. This matches what I saw in my picture in the first post where all the gooey stuff was near the inside of the glue joint. this time I kept the RTV near the edge of the flange (i.e. away from the central pipe).
You should use some sort of mechanical fastening on the flange also. I used 5/16" x 1 3/4" Tapcons to secure the flange. These don’t fit tight in the holes in the flange and should allow for some expansion as the oven heats and cools.
Hopefully this problem is solved.
One other thing: I didn’t use mortar on the firebrick. Looking back at my photo and notes I actually had good adhesion to the brick and not so good to the metal flange.
As I guessed upthread, you’ve turned an unfortunate experience into a helpful addition to our knowledge base. We’ll know better how it turned out once you’ve had a few fires in your oven and continued to see the chimney piece not fly off.
Their advice about applying the red near the outside of the flange/brick makes sense. I have not (yet) directly measured the temperature of the gases coming out the stack, but I’ve had a couple of fires that have gotten my interior brick over 1,000°F, which is the high limit of my infrared scanner.
Take the mortar/bareface brick thing as a part of troubleshooting. I was looking for the differences between your installation and mine, so I appreciate the datapoint.
The Tapcon / Masonry screws are an excellent way to attach the Anchor Plate to the fire brick… and we actually suggested that at one time.
But we soon discovered (after receiving numerous frantic phone calls and emails from upset customers) that several first time masonry DIY’ers were cracking &/or breaking the chimney fire brick while drilling the Anchor Plate screw holes… and most of those customers had already mortared those fire brick in! YIKES!
So we decided to remove the part about drilling / screwing the plate down - and just going REALLY HEAVY w/ the Red High Temp RTV.
IF YOU DO ATTACH THE ANCHOR PLATE WITH SCREWS, please take numerous Before / During / After images and we will make a forum post (with detailed instructions) on how to properly install an AP w/ Tapcons.
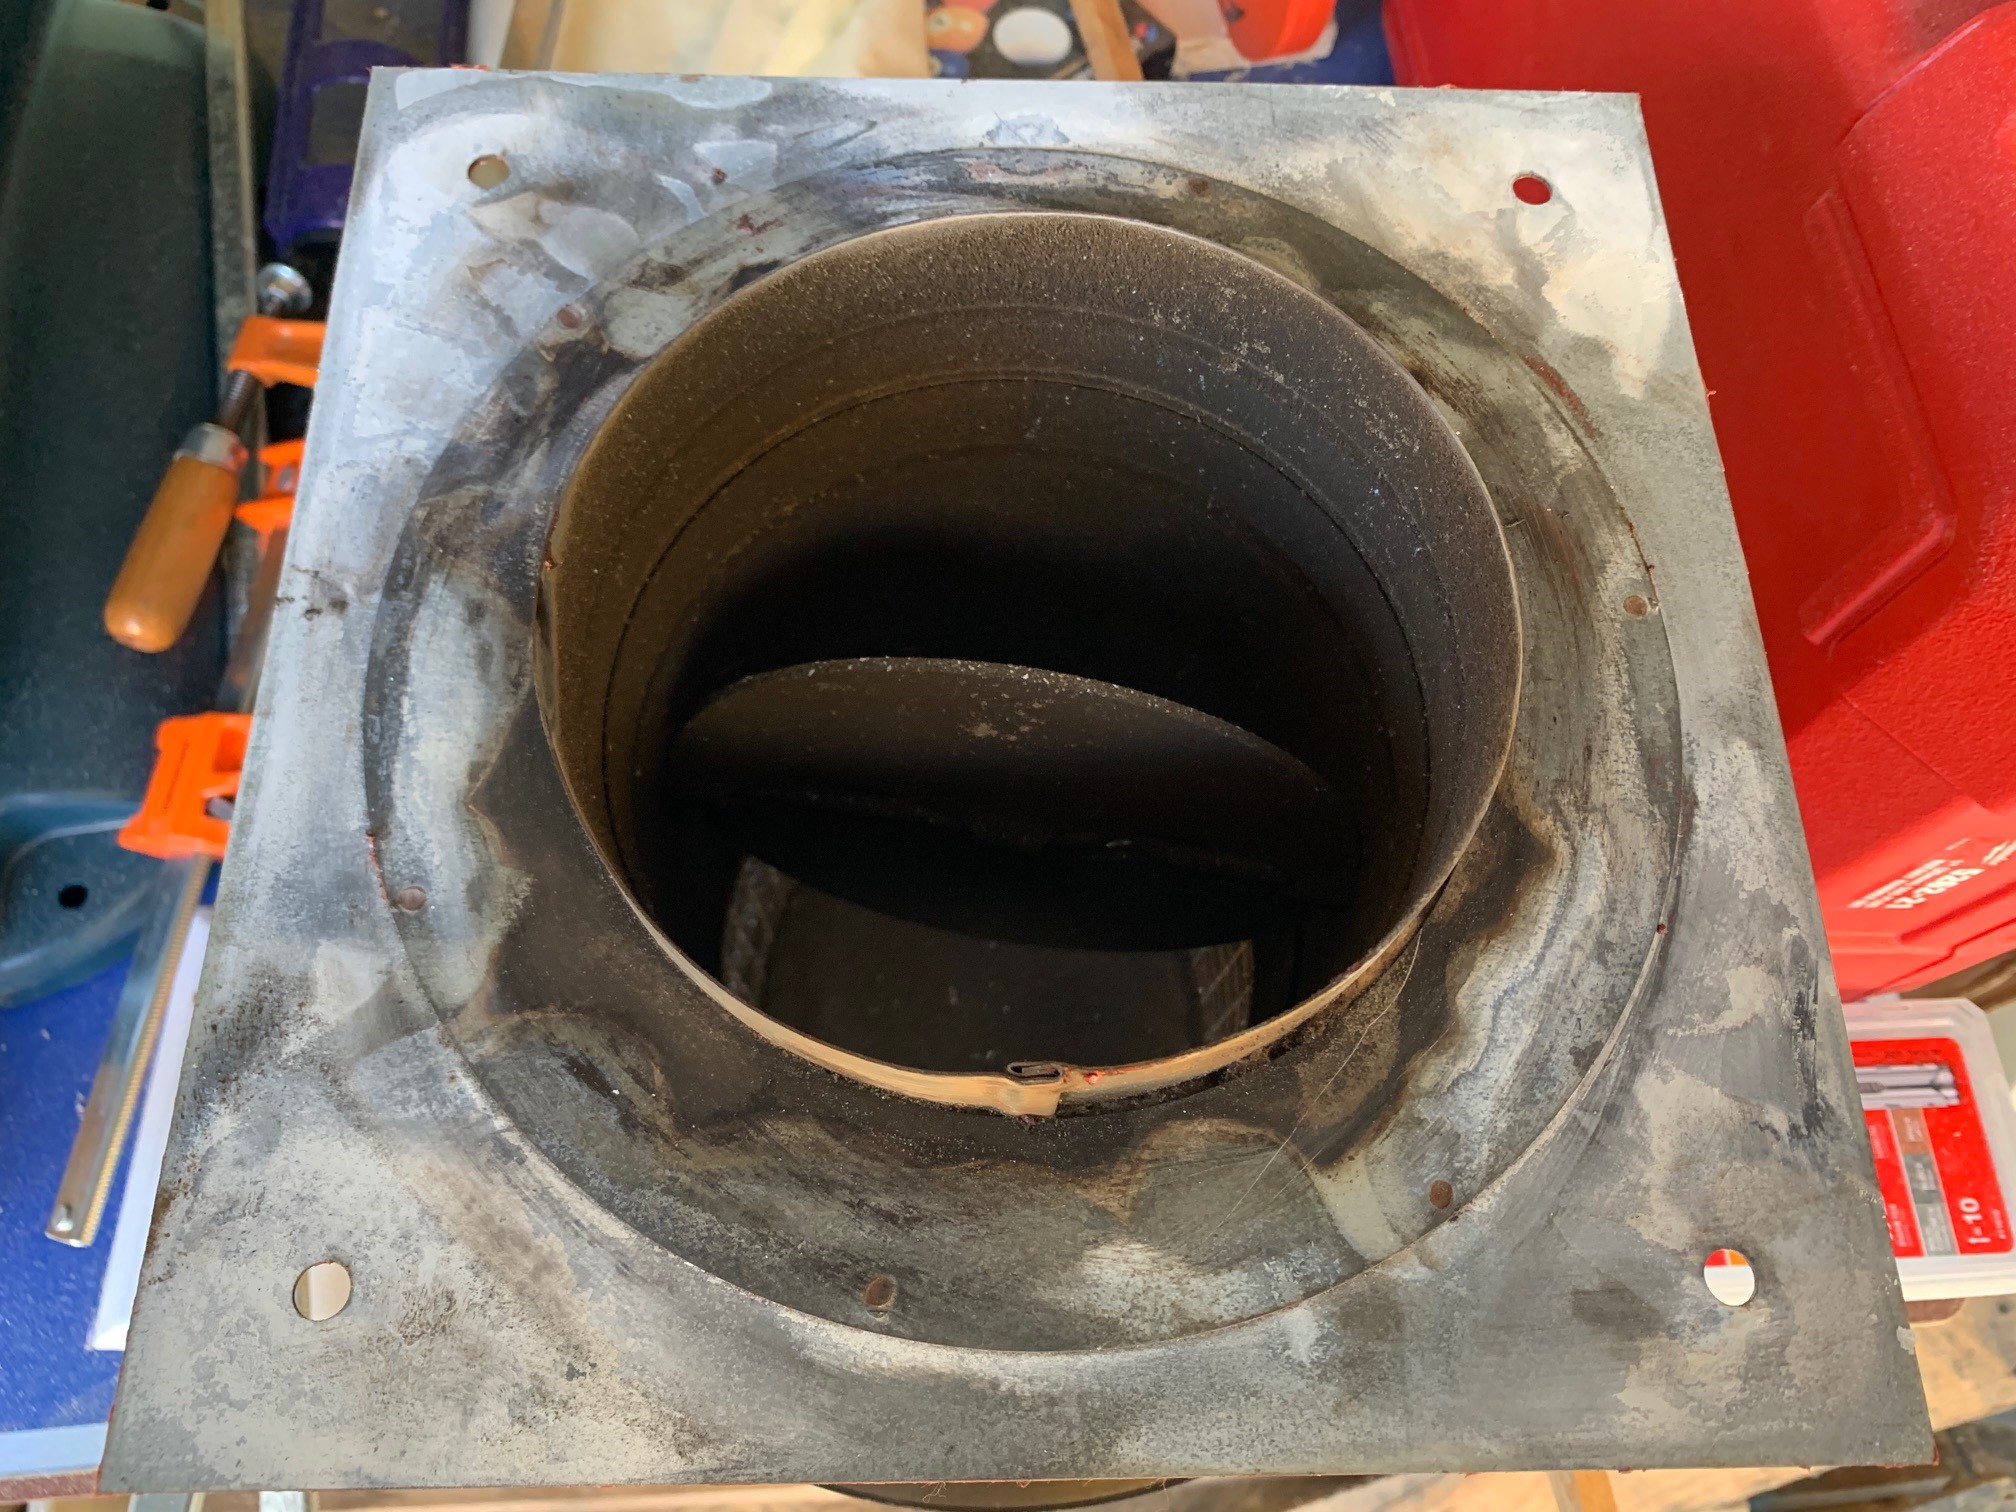
So this is Class A, double walled stove pipe which is basically state of the art. But see that circular flange that attached to the square flange? That’s the interface between the inner pipe and the outer pipe. This is where heat can get between the inner and outer pipe. Looking at my original posting you can see this is where the RTV broke down.
Solution: Keep the RTV on the square part of the flange. Let that circular ring sit directly on the firebrick. I wish I took a picture, but I didn’t.
Now for the tapcons. This is where you need the proper tools.
Use the carbide tip drill bit recommended by the Tapcon supplier
Use a hammer drill and don’t force it. You don’t need a lot of pressure. I’ve used regular drills and it’s harder and prone to mistakes
Drill past the length of the screw. I go 1/4 -1/2" past the length of the screw. You don’t want it binding up. You’ll crack the brick or break the screw. (I’ve done both)
Clean the hole and surroundings out. If you pull the drill out and wipe the pile of dust off the bricks odds are you just wiped some dust back into the hole you just drilled. I blow off the bricks then re-drill a couple times with light pressure to clean out all the dust. Remember, rock doesn’t compress like wood.
Do not over tighten the tapcons. All they need to do is sit snugly on the flange.
If you did it right you’ll get some squeeze out at the edge of the flange and through the screw holes which you can smooth with your finger.
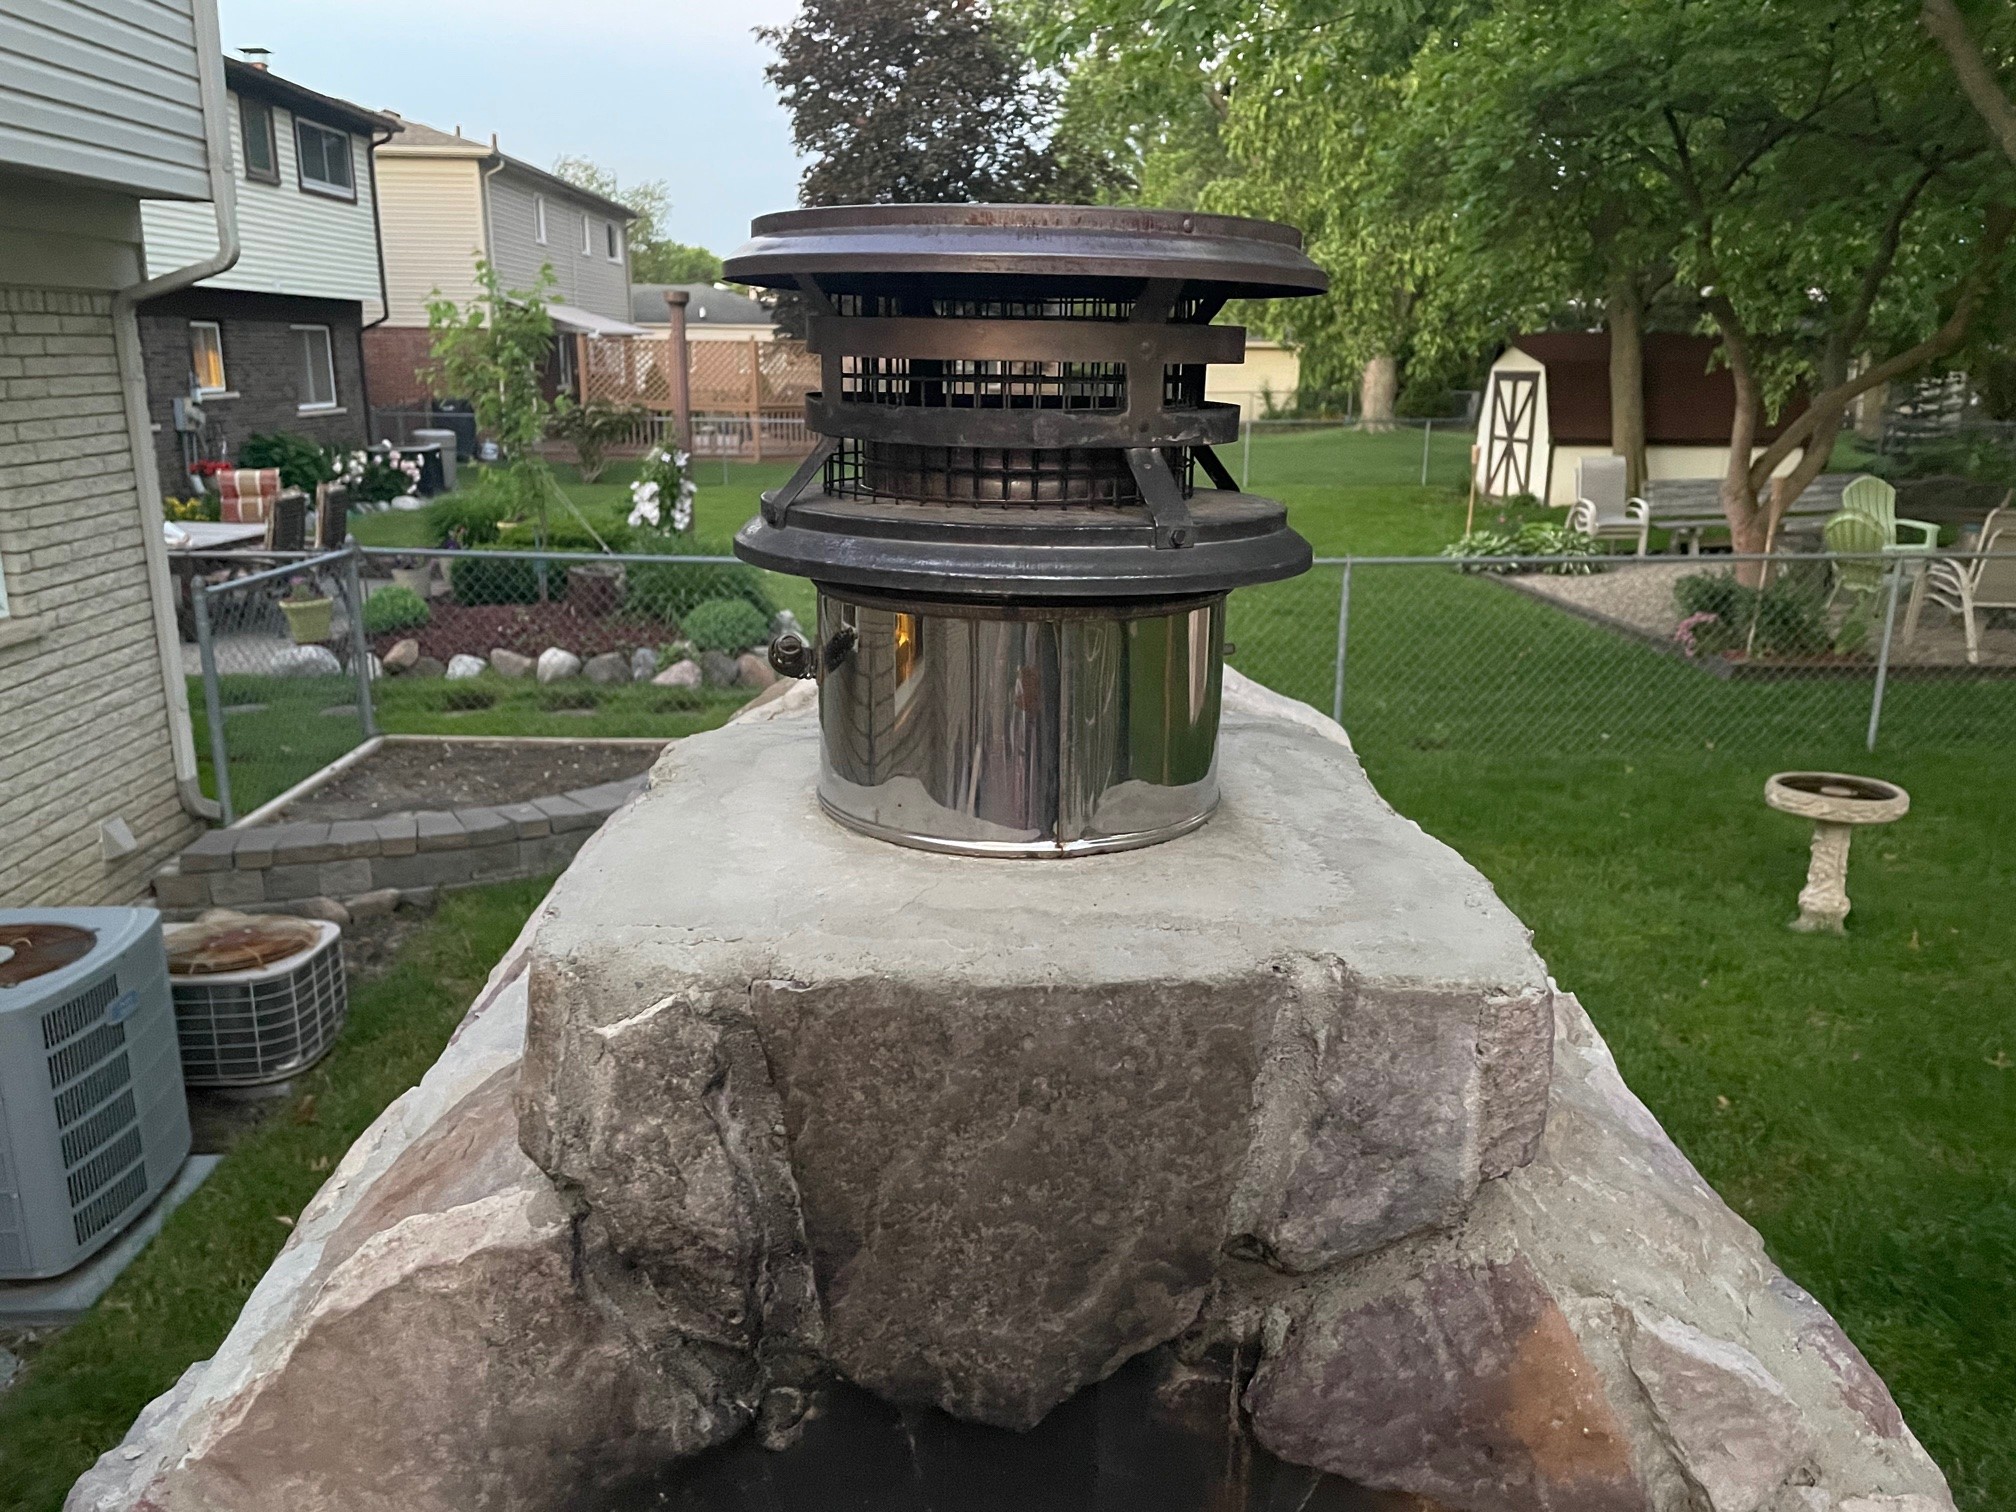
Final post on this topic (Unless events conspire against me and something breaks):
To finish off the cap I used the 5000 PSI concrete rather than mortar. Information on the web indicated that the concrete (rather than the high temp mortar I was considering above) would better survive both the Michigan weather and the temperature cycling. The concrete is slanted away from the vent pipe so water runs off. It’s thinner than I would like but I wanted to be able to remove the damper pipe so I can tarp up the oven during winter or replace it should it ever wear out.
I’m a couple fires in and through a Michigan spring. Here’s hoping this problem is solved…
And the texture / finish looks natural w/ your veneer & mortar. And rounding the mortar so water rolls off is an excellent addition. We are going to make that an option / suggestion on Directions 2.0 w/ a link to a specific forum post. If you could send us any additional photos of the project, we would greatly appreciate it!
Make sure you seal all of the masonry from top-to-bottom with an ORGANIC masonry sealer. You only want ORGANIC compounds on or near your pizza oven… unless you like the dizzying-headrush that chemical based sealers provide as the chemicals in the sealer starts to breakdown as the oven is heating-up.
Seriously though, the overpowering chemical smell will make you and your guests sick. ONLY USE ORGANIC SEALERS!
Here is what we recommend (and it’s also sold Walmart.com and Amazon)