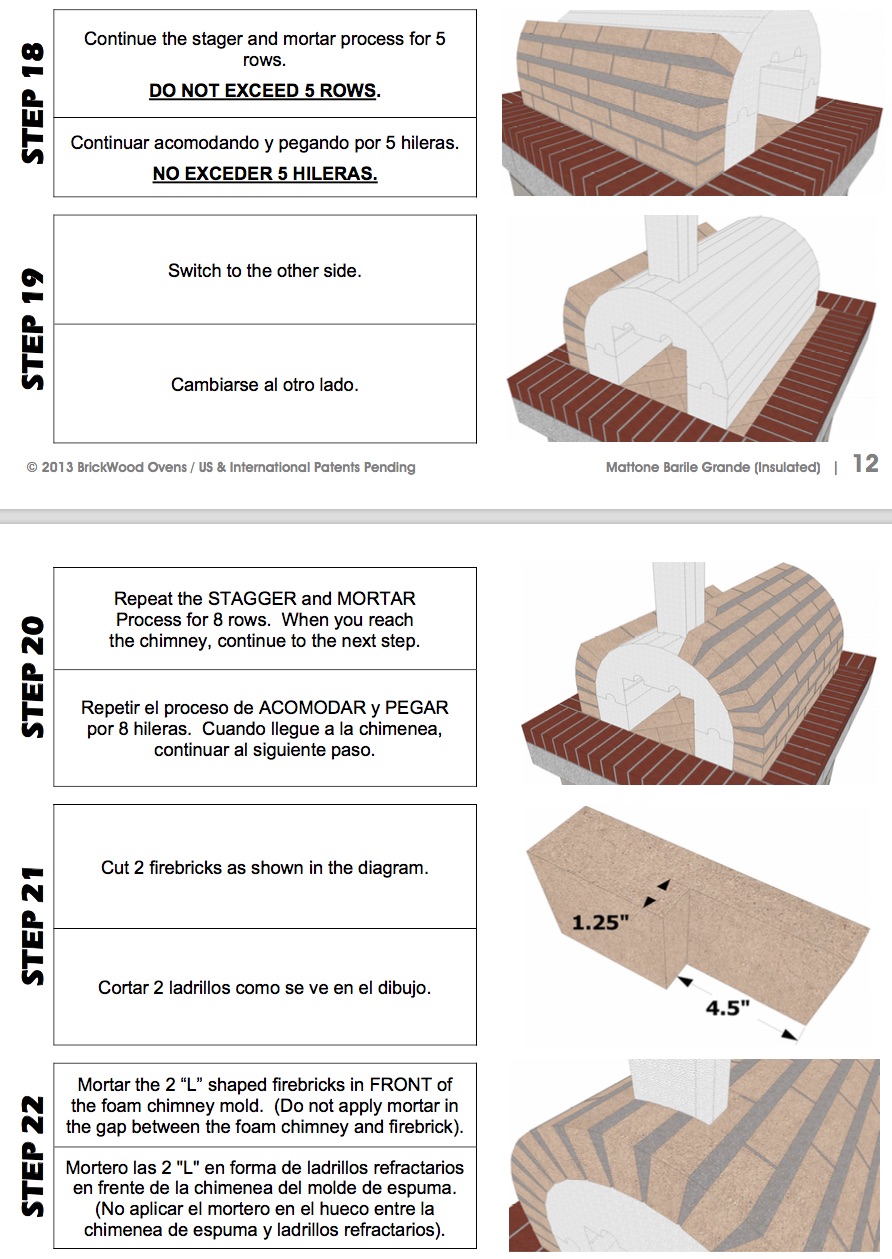
I’m settled on building the Mattone Barile Grande oven, and now going over the instructions in preparation. I ran into a confusing sequence of instructions at steps 18 through 22.
Step 18 is an instruction to build up the first 5 rows of firebrick on the left side, then to stop.
Steps 19-20 are building up the right side, all the way to the chimney. The diagram at step 20 shows the first 5 rows built up on the left, as instructed.
Step 21 is cutting two firebricks to shape, and Step 22 is installing those two firebricks in front of the chimney mold.
The Step 22 diagram shows BOTH sides built all the way up.
My question is: when did THAT happen?
Is there an instruction missing in the manual? What was the purpose of partially constructing the left side before moving to the right?
Thanks for any clarifications you can offer. I’m really looking forward to this project!
You want to start w/ 5 or 6 layers on the right or left side then switch to the opposing side for one reason - so the form doesn’t move while you are constructing the oven. That’s all -
By mortaring one side in place, then mortaring the other side in place, it “locks” the form into place on top of the hearth cooking surface. Another suggestion (that we’ll add in Directions 2.0) is you might want to put a cinderblock or two INSIDE the form while mortaring the firebrick into position - this will guarantee the form does not shift during construction. Granted, we’ve never had a customer tell us their form moved during construction - we just think… an ounce of prevention…
Thx for the question!
Kevin
Thanks Kevin. That makes sense!
So, the idea (in current Directions-Land) would be to brick up side 2, then to finish bricking up side 1 before proceeding to the L-shaped cuts.
I am all in favor of preventing things that can be prevented, and the suggestion to place a couple of cinder blocks inside the mold at the beginning sounds great. Consider me an early adopter.
–
Matt
A more general suggestion: when revising the directions, it’s good to offer a short explanation for doing things whenever you can, and whenever it doesn’t get in the way of getting the project done. Your audience seems to be overwhelmingly folks like me who are doing something like this for the first time, and a quick explanation keeps us from getting stuck on “why” questions.
I know that many of your FAQs deal with those questions, and a lot of them could be headed off if they were embedded in the directions.
Thanks again,
Matt
1 Like
I agree -
In Directions 2.0 we will be dropping the Spanish portion of the directions and that will give us more room for explaining the purpose of each step and why you do it.
I have done this for our BrickWood Box instructions - it’s CrAzY detailed and explains the purpose of each step in detail. http://store.brickwoodovens.com/brickwood-box-installation-manual/
I would HIGHLY recommend you download it - just for the first 40 pages of info alone. I’ve taken everything I’ve learned for the past 20 years and put it on paper. If you read that - you’ll be able to build an outdoor oven w/ your eyes closed!
Thx -
Kevin
I did just that, Kevin. They do look insanely detailed (which I mean as a compliment). I’ve combed through many of the FAQs already, and I recognize now that a lot of them are components for this particular manual.
I know it will be overkill for folks who just want to BTDO (build the darned oven), but this kind of discussion is helpful for me and others like me who tackle a DIY project like this because we want to learn as much as we can about the principles behind it.
And as a bonus, I finally got a solid answer to my question about frost-proofing my slab! It will save me hours of work.
Thanks again,
Matt